Saturday, January 8, 2011

Distributing your outgoing mails from Multiple IP addresses

Some mail providers like hotmail, yahoo restrict the number of connections from a single IP and the number of mails that can be delivered in an hour from a single IP. To increase your ability to deliver large number of genuine emails from your users to such sites, you may want to send out mails from multiple IP addresses.

IndiMail has the ability to call a custom program instead of qmail-local(8) or qmail-remote(8). This is done by defining the environment variable QMAILLOCAL or QMAILREMOTE. qmail-remote(8) can use the environment variable OUTGOINGIP to set the IP address of the local interface when making outgoing connections. By writing a simple script and setting QMAILREMOTE environment variable pointing to this script, one can randomly chose an IP address from the control file

/var/indimail/control/outgoingip

The script below also allows you to define multiple outgoing IP addresses for a single host. e.g. you can create the control file to send out mails from multiple IPs only for the domain hotmail.com

/var/indimail/control/outgoingip.hotmail.com

Let us name the below script balance_outgoing

% su
# echo "/var/indimail/bin/balance_outgoing" > /service/qmail-send.25/variables/QMAILREMOTE
# svc -d /service/qmail-send.25
# svc -u /service/qmail-send.25
# exit
%

Finally the balance_outgoing script can be placed with execute bit in /var/indimail/bin

#!/bin/sh
# This scripts expects qmail-remote arguments on command line
# argv0          - qmail-remote
# argv1          - host   (host)
# argv2          - sender (sender)
# argv3          - qqeh   (qmail queue extra header)
# argv4          - size
# argv5 .. argvn - recipients
#
#
host=$1
sender=$2
qqeh=$3
size=$4
shift 4

cd /var/indimail
if [ " $CONTROLDIR" = " " ] ; then
    FN=/var/indimail/control/filterargs
else
    FN=$CONTROLDIR/filterargs
fi
if [ -n "$SPAMFILTER" -o -n "$FILTERARGS" -o -f $FN ] ; then
    # execute spawn-filter if you have filters defined for remote/local deliveries
    PROG="bin/spawn-filter"
else
    PROG="bin/qmail-remote"
fi
if [ " $CONTROLDIR" = " " ] ; then
    if [ -f /var/indimail/control/outgoingip.$host ] ; then
        IP=(`cat /var/indimail/control/outgoingip.$host`)
    elif [ -f /var/indimail/control/outgoingip ] ; then
        IP=(`cat /var/indimail/control/outgoingip`)
    else
        exec -a qmail-remote $PROG "$host" "$sender" "$qqeh" $size $*
    fi
else
    if [ -f $CONTROLDIR/outgoingip.$host ] ; then
        IP=(`cat $CONTROLDIR/outgoingip.$host`)
    elif [ -f $CONTROLDIR/outgoingip ] ; then
        IP=(`cat $CONTROLDIR/outgoingip`)
    else
        exec -a qmail-remote $PROG "$host" "$sender" "$qqeh" $size $*
    fi
fi
IP_COUNT=${#IP[*]}
if [ $IP_COUNT -gt 1 ] ; then
    i=`expr $RANDOM % $IP_COUNT`
    export OUTGOINGIP=${IP[$i]}
fi
exec -a qmail-remote $PROG "$host" "$sender" "$qqeh" $size $*

Monday, August 2, 2010

Handling Bounces yourself

IndiMail allows a mechanism by which you can use your own script/program to handle bounces. All bounces in IndiMail is generated by qmail-send. qmail-send generates a bounce when qmail-lspawn or qmail-rspawn reports a permanent failed delivery. A bounce is generated by qmail-send by injecting a new mail in the queue using qmail-queue. This bounce generation by qmail-send can be modified in three ways

1. Using environment variable BOUNCEPROCESSOR

When you define the environment variable BOUNCEPROCESSOR as a valid path to a program or script, the program gets called whenever a delivery fails permanently. The program runs with the uid qmails and is passed the following five arguments

bounce_file bounce_report bounce_sender original_recipient bounce_recipient

To set BOUNCEPROCESSOR, you would do the following

# echo "path_of_your_bounce_processor" > /service/qmail-send.25/variables/BOUNCEPROCESSOR

There are few email marketing companies who are using BOUNCEPROCESSOR to insert the status of all bounces in MySQL table for their email marketing campaigns.

2 Using environment variable BOUNCERULES or control files bounce.envrules.

Using envrules, you can set specific environment variables only for bounced recipients. The format of  this  file  is  of  the  form

pat:envar1=val,envar2=val,...]

where pat is a regular expression which matches a bounce recipient.  envar1, envar2 are list of environment variables to be set. If var is omitted, the environment variable is unset.

e.g.

support@indimail.org:CONTROLDIR=control2,QMAILQUEUE=/var/indimail/bin/qmail-nullqueue

causes all bounces generated for the sender support@indimail.org to be discarded.

3. Using BOUNCEQUEUE environment variable to queue bounces


qmail-send  uses  qmail-queue to queue bounces and aliases/forwards. This can be changed by using QMAILQUEUE environment variable. If a different queue program is desired for bounces, it can be set by using BOUNCEQUEUE environment variable.

e.g

# echo /var/indimail/bin/qmail-nullqueue > /service/qmail-send.25/variables/BOUNCEQUEUE

disables bounces system-wide. Though disabling bounces may not be the right thing to do but in some situations where bounces are not at all needed, disabling bounces will surely result in performance improvements of your system, especially so if your system does mass-mailing.

Tuesday, July 13, 2010

Delivery Instructions for a Virtual Domain

IndiMail uses a modified version of qmail as the MTA. For local deliveries, qmail-lspawn reads a series of local delivery commands from descriptor 0, invokes qmail-local to perform the deliveries. qmail-local reads a mail message and delivers to to a user by the procedure described in dot-qmail(5). IndiMail uses vdelivermail as the local delivery agent.

A virtual domain is created by the command vadddomain(1).

% vadddomain example.com some_password

The above command creates a virtual domain with delivery instructions in /var/indimail/domains/example.com/.qmail-default file. A line in this file is of the form

/var/indimail/sbin/vdelivermail '' delivery_instruction_for_non_existing_user

The delivery_instruction_for_non_existing_user can have one of the following 5 forms

  1. delete
  2. bounce-no-mailbox
  3. Maildir
  4. emailAddress
  5. IPaddress
Using delete as the delivery instruction causes IndiMail to discard all mails addressed to non-existing users. The original sender does not get notified of the delivery. On a real messaging system serving real users, you will not want to do this.

The instruction bounce-no-mailbox causes a bounce to be generated to the sender in case an email is addressed to a non-existing user. This is the most common usage in .qmail-default which most IndiMail installations will have

The instruction Maildir causes emails to be addressed to non-existing users to be saved in a Maildir. Here Maildir should refer to a full path of an existing Maildir.

The instruction emailAddress causes emails to be addressed to non-existing users to be forwarded to an email address emailAddress.

The instruction IPaddress causes emails to be addressed to non-existing users to be redirected to a remote SMTP server at IP IPaddress. The format of IPaddress is domain:ip:port where domain is the domain name, ip is the IP address of the remote SMTP server and port is the SMTP port on the remote SMTP server. It is expected that the non-existing user is present on the remote system. This type of delivery is used by IndiMail on a clustered setup. In a clustered setup, users are distributed across multiple server. A particular user will be located only on one particular server. However, the same domain will be present on multiple servers.

In the delivery instruction in .qmail-default, you can replace vdelivermail with vfilter to perform in-line filtering use IndiMail's poweful vfilter. You can create filters using the program vcfilter.

Thursday, July 8, 2010

Relaying - How does IndiMail handle relaying securely

A SMTP server is responsible for accepting mails from a sender and processing it for delivery to one or more recipients. In most situations, for domains which are under your administrative control (native addresses), the SMTP server should accept mails without authentication. However, when a mail is submitted for delivery to domains which are not under your administrative control, you should accept mails only after it satisfies security considerations like having the sender authenticate itself. This is to prevent abuse of external domains using your SMTP server. A SMTP server which accepts mails for external domains without any authentication is called an open relay. The act of accepting mails for external domains for delivery is called relaying.

The default configuration of IndiMail configures the SMTP as a closed system. Hence to be able to send mails to external domains, you need to setup mechanisms for relaying.

There are many methods. Choose any of the below after studying them. I prefer 3 or 4 for security reasons.
  1. Have Sender's IP addresses in tcp.smtp file
  2. Use control file relayclients for IP addresses of clients allowed to relay mail through this host.
  3. Configure IndiMail to use MySQL relay table (good security). This is implemented on POP3/IMAP before SMTP
  4. Use authenticated SMTP (good security)
  5. For allowing relay to specific domains use control file relaydomains
  6. For allowing specific users (native addresses) use control file relaymailfrom
  • NOTE: you should use 1 & 2 only if if the host having the sender's IP is under your control and you have good security policies for the host (however what is a good security can be very subjective)
Using tcp.smtp

Your startup script for the qmail smtp server must use the tcpserver -x file option similar to this startup line.

env - PATH="/var/indimail/bin" tcpserver -H -R -x /var/indimail/etc/tcp.smtp.cdb \
-c 20 -u 555 -g 555 0 smtp /var/indimail/bin/qmail-smtpd 2>&1

IndiMail uses -x option to tcpserver and hence you need not bother about the above line. You however need to edit /var/indimail/etc/tcp.smtp and put in lines for all static IP's that you will always want to relay access to.

127.0.0.:allow,RELAYCLIENT=””
10.1.1.:allow,RELAYCLIENT=””

The above lines will cause RELAYCLIENT environment variable to be set for localhost and all machines on the 10.1.1 class and hence allow to relay through. Remember that any user on hosts on 10.1.1 class will be able to relay mails. You many not want this. The line having 127.0.0. will allow any client on the IndiMail host to use SMTP and relay mails.

If you add any IP to tcp.smtp, you have to rebuild a cdb database tcp.smtp.cdb. You can run the following command

% sudo /var/indimail/bin/qmailctl cdb


NOTE: Remember that you are exposed to unrestricted relaying from any of the IP addresses listed in tcp.smtp

Using control file relayclients

IP addresses of clients allowed to relay mail  through  this  host.   Each address should be followed by a colon and an (optional) string that should be appended to each incoming recipient address, just as  with  the  RELAYCLIENT environment variable.  Nearly always, the optional string should be null. The filename can be overriden by  the  environment  variable  RELAYCLIENTS.

Addresses in relayclients may be wildcarded (2nd line in the example below):

 192.168.0.1:
 192.168.1.:

Using MySQL relay table

Run the command /var/indimail/bin/clearopensmtp in the cron every 30 Minutes

By default every time who uses IndiMail's  POP3 or IMAP service and authenticates, the following happens:
  1. On successful authentication, IMAP/POP3 daemon inserts entry into relay table, inserting email, IP address and timestamp.
  2. If CHECKRELAY environment variable is enabled, SMTP checks the relay table for a entry within minutes specified by the RELAY_CLEAR_MINUTES environment variable. If the entry is there, RELAYCLIENT environment variable is set, which allows relaying. At this point, the SMTP server will allow that IP to relay for 60 Mins (default)
clearopensmtp will clear all IP which have not authenticated in the past RELAY_CLEAR_MINUTESclearopensmtp should be enabled in cron to run every 30 minutes.

Set up Authenticated SMTP

IndiMail also provides you authenticated SMTP providing AUTH PLAIN, AUTH LOGIN and AUTH CRAM-MD5 methods. Whenever a user successfully authenticates through SMTP, the RELAYCLIENT environment variable gets set. qmail-smtpd uses the RELAYCLIENT environment variable to allow relaying.

Most of the email clients like thunderbird, evolution, outlook, outlook express have options to use authenticated SMTP.

For a tutorial on authenticated SMTP, you can refer to
http://indimail.blogspot.com/2010/03/authenticated-smtp-tutorial.html

Using control file relaydomains

Host  and  domain  names  allowed  to  relay mail through this host.  Each  
address should be followed by a colon and an (optional) string that should 
be  appended  to  each incoming recipient address, just as with the RELAY\
CLIENT environment variable.  Nearly always, the optional string should be 
null. 
Addresses in relaydomains may be wildcarded:


  heaven.af.mil:
  .heaven.af.mil:

Using control file relaymailfrom

envelope  senders (MAIL FROM) listed in this file will be allowed to relay independently of the RELAYCLIENT environment variable. Entries in relaymailfrom can be E-Mail addresses, or just the domain (with the @ sign).

Unlike relaydomains native addresses should be entered.  A line in  relay mailfrom  may be of the form @host, meaning every address at host.  relaymailfrom can also be in cdb format. If relaymailfrom.cdb  is  present,  it will be searched first.

Examples:
  joeblow@domain1.com
  @domain2.com

If you use the control file /var/indimail/control/relaymailfrom, you should really know what you are doing. Any mail from having a domain component of the address matching any domain in this file, relaying will be allowed without any authentication. You can most probably use this only if you have a closed SMTP server to which access from outside is not possible.

Wednesday, June 30, 2010

Setting Disclaimers on your outgoing mails

In my earlier article, I showed how to set up automatic rule based archival. I had discussed email archival as one of the many compliance requirements you might have. Sometimes you may also require to configure disclaimers in your messaging system. e.g for UK Companies Act 2006, IRS Circular 230.

IndiMail provides a utility called altermime(1) to add your own disclaimers on each and every mail that goes out through your IndiMail messaging server. You can use any of the two options below to configure disclaimers

Option 1 - using /var/indimail/control/filterargs

The filterargs control file allows you to insert any filter before remote or local delivery. You can use altermime to insert a disclaimer as below

*:/var/indimail/bin/altermime --input=- \
--disclaimer=/var/indimail/control/disclaimer

If you want disclaimer to be used only for your outgoing mails then, you could do the following

*:remote:/var/indimail/bin/altermime --input=- \
--disclaimer=/var/indimail/control/disclaimer

In both the above examples the file /var/indimail/control/disclaimer contains the text of your disclaimer

Option 2 - Set the FILTERARGS environment variable
Just like filterargs control file, the environment variable FILTERARGS allows you to set any custom filter before your mail gets deposited into the queue by qmail-queue(8).

% su
# echo /var/indimail/bin/altermime --input=- --disclaimer=/var/indimail/control/disclaimer \
> /service/qmail-smtpd.587/variables/FILTERARGS
# svc -d /service/qmail-smtpd.587
# svc -u /service/qmail-smtpd.587

Read altermime(1) man page for more details

You can download IndiMail at
http://sourceforge.net/projects/indimail/

The RPM can be downloaded from
http://download.opensuse.org/repositories/home:/indimail/

Subscribe to indimail

Email:

Visit this group

Saturday, June 26, 2010

Email Archiving

IndiMail provides multiple options for those who want their emails archived automatically.

For easy retrieval, you can use tools like google desktop, beagle, etc

If you use IndiMail, you have two methods to achieve automatic archiving of emails

1. using environment variable EXTRAQUEUE
If EXTRAQUEUE environment variable is set to any environment variable, qmail-queue will deposit an extra copy of the email which it receives for putting it in the queue. Normally you would set EXTRAQUEUE variable in any of the clients which use qmail-queue. e.g. qmail-smtpd, qmail-inject, sendmail, etc. If you have setup IndiMail as per the official instructions, you can set EXTRAQUEUE for incoming and outgoing mails as given below

% su
# echo "archive@example.com" > /service/qmail-smtpd.25/variables/EXTRAQUEUE
# echo "archive@example.com" > /service/qmail-smtpd.587/variables/EXTRAQUEUE
# svc -d /service/qmail-smtpd.25 /service/qmail-smtpd.587
# svc -u /service/qmail-smtpd.25 /service/qmail-smtpd.587
# exit
Now all your emails coming in and going out of the system, a copy will be sent to archive@example.com. If archive@example.com lies on IndiMail Messaging Platform, you can set filters (using vfilter(1)) to automatically deposit the mails in different folders. The folders can be decided on various criteria like date, sender, recipient, domain, etc.

2. using control file mailarchive
This control file allows you to set up rule based archiving. For any specific sender or recipient, you can set a rule to select a destination email for archiving. This is much more flexible than using EXTRAQUEUE which allowed you to archive emails to a single email address. A line in the control file mailarchive can be of the form

type:regexp:dest_address

Here type is 'T' to set a rule on recipients. You can set the type as 'F' to set a rule on the sender.

regexp is any email address which matches the sender or recipient (depending on whether type is 'T' or 'F').

dest_address should expand to a valid email address. You can have a valid email address. You can also have the '%' sign followed by the letters u, d or e in the address to have the following substitutions made

%u - gets replaced by the user component of email address (without the '@' sign)
%d - gets replaced by the domain component of email address
%e - gets replaced by the email address

The email address in the above substitution will be the recipient (if type is 'T') and the sender (if type is 'F').

another example and a cool tip :)

T:*:%u@arch%d

Will make a hot standby of your incoming mails for yourdomain on another server hosting archyourdomain.

NOTE: Currently only type = 'F' is implemented. type='T' will be implemented in release 1.7.8

For some organizations, email archiving is a must due to compliance with regulatory standards like SOX, HIPAA, Basel II Accord (effective 2006), Canadian Privacy Act, Data Protection Act 1988, EU Data Protection Directive 95/46/FC, Federal Information Security Management Act (FISMA), Federal Rules of Civil Procedure (FRCP), Financial Services Act 198, regulated by FSA, Freedom of Information Act (FOIA), Freedom of Information Act (in force January 2005), The Gramm-Leach-Bliley Act (GLBA), MiFID (Markets in Financial Instruments Directives), PIPEDA (Personal Information Protection and Electronic Documents Act), SEC Rule 17a-4/ NASD 3010 (Securities Exchange Act 1934).

Apart from archiving, you would also want to set disclaimers. IndiMail allows you to set a disclaimer by setting the FILTERARGS environment variable and using altermime(1). The following acts/circular specifically require you to set disclaimers.


Reference


You can download IndiMail at
http://sourceforge.net/projects/indimail/

The RPM can be downloaded from
http://download.opensuse.org/repositories/home:/indimail/


Subscribe to indimail

Email:

Visit this group

Thursday, June 10, 2010

Setting Limits for your Virtual Domain

IndiMail comes with a program vlimit(1), which allows you to set global limits for your domain. Before using vlimit, you need to enable domain limits for a domain using vmoddomain(1).

% vmoddomain -l 1 example.com

Once you have done the above, you can start using vlimit for the domain example.com

% vlimit -s example.com
Domain Expiry Date : Never Expires
Password Expiry Date : Never Expires
Max Domain Quota : -1
Max Domain Messages : -1
Default User Quota : -1
Default User Messages: -1
Max Pop Accounts : -1
Max Aliases : -1
Max Forwards : -1
Max Autoresponders : -1
Max Mailinglists : -1
GID Flags:
Flags for non postmaster accounts:
pop account : ALLOW_CREATE ALLOW_MODIFY ALLOW_DELETE
alias : ALLOW_CREATE ALLOW_MODIFY ALLOW_DELETE
forward : ALLOW_CREATE ALLOW_MODIFY ALLOW_DELETE
autoresponder : ALLOW_CREATE ALLOW_MODIFY ALLOW_DELETE
mailinglist : ALLOW_CREATE ALLOW_MODIFY ALLOW_DELETE
mailinglist users : ALLOW_CREATE ALLOW_MODIFY ALLOW_DELETE
mailinglist moderators: ALLOW_CREATE ALLOW_MODIFY ALLOW_DELETE
domain quota : ALLOW_CREATE ALLOW_MODIFY ALLOW_DELETE
default quota : ALLOW_CREATE ALLOW_MODIFY

Using vlimit you can set various limits or defaults for a domain. One of my favourite use of vlimit is setting default quota for users created in a domain. The default quota compiled in IndiMail is 5Mb which is not good enough for today's users. So if you want to have a default quota of 50 Mb for your users when you add them using the vadduser(1) command -

% vlimit -q 52428800 example.com
% vlimit -s example.com
Domain Expiry Date : Never Expires
Password Expiry Date : Never Expires
Max Domain Quota : -1
Max Domain Messages : -1
Default User Quota : 52428800
Default User Messages: -1
Max Pop Accounts : -1
Max Aliases : -1
Max Forwards : -1
Max Autoresponders : -1
Max Mailinglists : -1
GID Flags:
Flags for non postmaster accounts:
pop account : ALLOW_CREATE ALLOW_MODIFY ALLOW_DELETE
alias : ALLOW_CREATE ALLOW_MODIFY ALLOW_DELETE
forward : ALLOW_CREATE ALLOW_MODIFY ALLOW_DELETE
autoresponder : ALLOW_CREATE ALLOW_MODIFY ALLOW_DELETE
mailinglist : ALLOW_CREATE ALLOW_MODIFY ALLOW_DELETE
mailinglist users : ALLOW_CREATE ALLOW_MODIFY ALLOW_DELETE
mailinglist moderators: ALLOW_CREATE ALLOW_MODIFY ALLOW_DELETE
domain quota : ALLOW_CREATE ALLOW_MODIFY ALLOW_DELETE
default quota : ALLOW_CREATE ALLOW_MODIFY


You can also implement domain level restrictions. To disable POP3 for all users in example.com

% vlimit -g p example.com
% vlimit -s example.com
Domain Expiry Date : Never Expires
Password Expiry Date : Never Expires
Max Domain Quota : -1
Max Domain Messages : -1
Default User Quota : 52428800
Default User Messages: -1
Max Pop Accounts : -1
Max Aliases : -1
Max Forwards : -1
Max Autoresponders : -1
Max Mailinglists : -1
GID Flags:
NO_POP
Flags for non postmaster accounts:
pop account : ALLOW_CREATE ALLOW_MODIFY ALLOW_DELETE
alias : ALLOW_CREATE ALLOW_MODIFY ALLOW_DELETE
forward : ALLOW_CREATE ALLOW_MODIFY ALLOW_DELETE
autoresponder : ALLOW_CREATE ALLOW_MODIFY ALLOW_DELETE
mailinglist : ALLOW_CREATE ALLOW_MODIFY ALLOW_DELETE
mailinglist users : ALLOW_CREATE ALLOW_MODIFY ALLOW_DELETE
mailinglist moderators: ALLOW_CREATE ALLOW_MODIFY ALLOW_DELETE
domain quota : ALLOW_CREATE ALLOW_MODIFY ALLOW_DELETE
default quota : ALLOW_CREATE ALLOW_MODIFY


You can download IndiMail at
http://sourceforge.net/projects/indimail/

The RPM can be downloaded from
http://download.opensuse.org/repositories/home:/indimail/


Subscribe to indimail

Email:

Visit this group

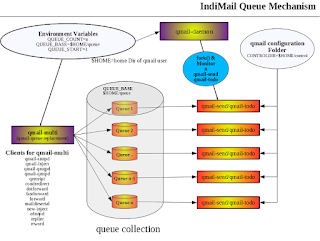
IndiMail Queue Mechanism

Indimail has the ability of configuring multiple local and remote queues. A queue is a location on your hard disk where email are deposited ...