Saturday, August 29, 2009

Greylisting in IndiMail

Greylisting is a method of defending email users against spam, by temporarily rejecting any email from a IP/Sender which it does not recognize. As per SMTP, the originating server should after a delay retry. A server implementing greylisting should accept the mail if sufficient time has elapsed. If the mail is from a spammer it will probably not be retried since a spammer goes through thousands of email addresses and typically cannot afford the time delay to retry.

IndiMail 1.6 onwards implements greylisting using qmail-greyd daemon. You additionally need to have the environment variable GREYIP defined for the qmail-smtpd process. The environment variable GREYIP specifies on which IP and port, qmail-greyd is accepting greylisting requests. qmail-smtpd uses UDP to send a triplet (IP+RETURN_PATH+RECIPIENT) to the greylisting server and waits for an answer which tells qmail-smtpd to proceed ahead or to temporarily reject the mail. qmail-greyd also accepts a list of whitelisted IP addresses for which greylisting should not be done.

1. Enabling qmail-greyd greylisting server
% su
# svctool --greylist=1999 --servicedir=/service --min-resend-min=2 \
--resend-win-hr=24 --timeout-days=30 --context-file=greylist.context \
--save-interval=5 --whitelist=greylist.whitelist --use-greydaemon


NOTE: The above service has already been setup for you, if you have done a binary installation of IndiMail/indimail-mta

2. Enabling greylisting in SMTP
  • Assuming you've setup your qmail-smtpd service with tcpserver with the -x option (as in LWQ), you just need to update the cdb file referenced by this -x option. The source for this file is typically /etc/indimail/tcp.smtp. For example,
      127.:allow,RELAYCLIENT=""
      192.168.:allow,RELAYCLIENT=""
      :allow
    • could become,
      127.:allow,RELAYCLIENT=""
      192.168.:allow,RELAYCLIENT=""
      :allow,GREYIP="127.0.0.1@1999"
    • If you've setup qmail-greyd on a non-default address (perhaps you're running qmail-greyd on a separate machine), you'll also need to specify the address it's listening on - adjust the above to include GREYIP="192.168.5.5@1999", for example.
    • Finally, don't forget to update the cdb file corresponding to the source file you've just edited. If you have a LWQ setup that's,
      # qmailctl cdb

    • Alternatively (and particularly if you're not using the -x option to tcpserver) you can enable greylisting for all SMTP connections by setting GREYIP in the environment in which qmail-smtpd is started - for example your variables directory for qmail-smtpd can contain a file with the name GREYIP
      # echo GREYIP=\"127.0.0.1@1999\" > /service/qmail-smtpd.25/variables/GREYIP
    NOTE: The above instructions are for IndiMail/indimail-mta 2.x and above. For 1.x releases, use /var/indimail/etc for the location of tcp.smtp and tcp.smtp.cdb
    Thursday, August 20, 2009

    Creating Self-Signed Certificate for TLS/SSL encryption

    If you have installed indimail using any of the RPM at

    http://download.opensuse.org/repositories/home:/mbhangui/


    you will get IMAPS, POP3S, SMTPS services installed by default. However Certificate are not installed by default. You may want to study the following google search. If you have not installed IndiMail using the RPM, then you can use svctool to create the IMAPS, POP3S, SMTPS services. Executing svctool without any option will give you a help screen.

    You can save yourself a lot of trouble by using svctool to create self-signed certificate for IMAPS, POP3S, SMTPS (or starttls in smtp)

    # /var/indimail/svctool --postmaster=postmaster@yourdomain --config=cert

    You are about to be asked to enter information that will be incorporated into your certificate request. What you are about to enter is what is called a Distinguished Name or a DN. There are quite a few fields but you can leave some blank. For some fields there will be a default value, If you just hit Enter, the field will be left blank. Please note: The common name must be the name of the mail server so make sure you enter it on that line:

    Country Name (2 letter code) [GB]:IN
    State or Province Name (full name) [Berkshire]:Goa
    Locality Name (eg, city) [Newbury]:Porvorim
    Organization Name (eg, company) [My Company Ltd]:IndiMail
    Organizational Unit Name (eg, section) []: Technology
    Common Name (eg, YOUR name) []: yourdomain
    Email Address []:user@domain.xxx

    Once you have given the above input, your certificate will be generated

    % ls -l /var/indimail/control/*.pem
    -rw-------. 1 indimail indimail 245 2009-08-19 07:39 dh1024.pem
    -rw-------. 1 indimail indimail 156 2009-08-19 07:39 dh512.pem
    -rw-------. 1 indimail indimail 497 2009-08-19 07:38 rsa512.pem
    lrwxrwxrwx. 1 root root 36 2009-08-19 07:38 clientcert.pem -> /var/indimail/control/servercert.pem
    -rw-r-----. 1 indimail indimail 2197 2009-08-19 07:38 servercert.pem

    Now you can use the following commands to test the services

    To connect to IMAPS
    openssl s_client -connect localhost:993

    To connect to POP3S
    openssl s_client -connect localhost:995

    To connect to SMTPS
    openssl s_client -connect localhost:465

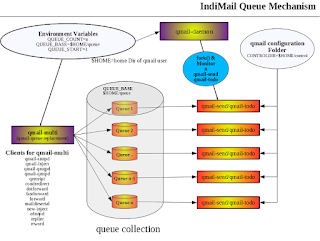
    IndiMail Queue Mechanism

    Indimail has the ability of configuring multiple local and remote queues. A queue is a location on your hard disk where email are deposited ...