Sunday, November 22, 2009

Publishing IndiMail Statistics for your domain

You can now configure MRTG Graphs to show statistics for IndiMail . You need to have mrtg installed on your system. If you do not have mrtg, you can execute yum/dnf

% sudo yum install mrtg

on some systems you might need to use dnf

% sudo dnf install mrtg

You need to execute the following steps (assuming your web server document root is /var/www/html)

 % sudo /usr/sbin/svctool --mrtg=/var/www/html/mailmrtg --servicedir=/service

After carrying out the above step,  check the status of mrtg service

% sudo svstat /service/mrtg
/service/mrtg/: up (pid 2443) 35254 seconds

Point your browser to /var/www/html/mailmrtg and you should see the graphs.

Wednesday, November 4, 2009

IndiMail INSTALLATION STEPS

IndiMail can be installed using the source, RPM or using a YUM repository.

If you have learnt the art of being patient the read the file INSTALL-version. You can read the file INSTALL-RPM-version in case you want to install from RPM (version is the version of IndiMail you want to install).

If you are in a hurry to install and setup IndiMail, download the RPM and read the file Quick-INSTALL-version. You can also install IndiMail in 10 Steps.

IndiMail RPM/Debian for various linux distros can be downloaded from
http://download.opensuse.org/repositories/home:/indimail/

The top level directory for current indimail source being maintained can be found at

https://sourceforge.net/projects/indimail/files/indimail


If you are installing from source, apart from downloading indimail-version.tar.gz, you need to download the following additionally

Mandatory Downloads
http://cr.yp.to/software/qmail-1.03.tar.gz
http://cr.yp.to/ucspi-tcp/ucspi-tcp-0.88.tar.gz
http://downloads.sourceforge.net/indimail/libdkim-1.4.tar.gz
http://downloads.sourceforge.net/clamav/clamav-0.97.8.tar.gz
http://downloads.sourceforge.net/indimail/courier-imap-4.13.tar.bz2

Highly Recommended Downloads
http://downloads.sourceforge.net/indimail/pam-multi-1.1.tar.gz
http://downloads.sourceforge.net/indimail/nssd-1.1.tar.gz

Optional Downloads
http://downloads.sourceforge.net/indimail/flash-0.9.4.tar.gz
http://downloads.sourceforge.net/indimail/altermime-0.3.10.tar.gz
http://downloads.sourceforge.net/indimail/ripmime-1.4.0.9.tar.gz
http://downloads.sourceforge.net/indimail/mpack-1.6.tar.gz

http://downloads.sourceforge.net/indimail/procmail-3.22.tar.gz
http://downloads.sourceforge.net/indimail/fortune-1.1.tar.gz
http://downloads.sourceforge.net/fetchmail/fetchmail-6.3.26.tar.bz2


If you are a newbie, you can drop me a note or request a free help on installing and setting up a mail server using IndiMail. I will be glad to help.

Saturday, October 31, 2009

Using spamassassin program with IndiMail

Just few days back a user asked me whether spamassassin can be used with IndiMail.

IndiMail uses environment variables SPAMFILTER, SPAMEXITCODE to configure any spam filter to be used. All that is required for the spam filter is to read a mail message on stdin, output the message back on stdout and exit with a number which indicates whether the message is ham or spam.

The default installation of IndiMail creates a configuration where mails get scanned by bogofilter for spam filtering. bogofilter exits with value '0' in case the message is spam and with value '1' when message is ham. The settings for SPAMFILTER, SPAMEXITCODE is as below

SPAMFILTER="/usr/bin/bogofilter -p -u -d /etc/indimail"
SPAMEXITCODE=0

Assuming that you have installed, setup and trained spamassassin, you can follow the instructions below to have IndiMail use spamassassin.

spamassasin has a client spamc which exits 1 when message is spam and exits 0 if the message is ham. To use spamassassin, just use the following for SPAMFILTER, SPAMEXITCODE


SPAMFILTER="path_to_spamc_program -E-d host -p port -u user"
SPAMEXITCODE=1

(see the documentation on spamc for description of arguments to spamc program). You an also use -U socket_path, to use unix domain socket instead of -d host, which uses tcp/ip

Since IndiMail uses envdir program to set environment variable, a simple way would be to set SPAMFILTER, SPAMEXITCODE is to do the following
% su
# echo "spamcPath -E -d host -p port -u user" > /service/qmail-smtpd.25/variables/SPAMFILTER
# echo 1 > /service/qmail-smtpd.25/variables/SPAMEXITCODE

What if you want to use both bogofilter and spamasssin. You can use a simple script like below as the SPAMFILTER program
#!/bin/bash
#
# you can -U option in spamc, pointing to a unix domain path instead of -d
#
DESTHOST=x.x.x.x

#
# pass the output of bogofilter to spamc and passthrough spamc output to stdout
# store the exit status of bogofilter in status1 and spamc in status2
#
/usr/bin/bogofilter -p -d /etc/indimail | /usr/bin/spamc -E -d $DESTHOST -p 783
STATUS=("${PIPESTATUS[@]}")
status1=${STATUS[0]}
status2=${STATUS[1]}

# bogofilter returned error
if [ $status1 -eq 2 ] ; then
exit 2
fi
# spamc returned error see the man page for spamc
if [ $status2 -ge 64 -a $status2 -le 78 ] ; then
exit 2
fi

#
# message is spam
# bogofilter returns 0 on spam, spamc returns 1 on spam
#
if [ $status1 -eq 0 -o $status2 -eq 1 ] ; then
exit 0
fi
exit 1

Let us call the above script as bogospamc and let us place it in /usr/bin
% su
# echo /usr/bin/bogospamc > /service/qmail-smtpd.25/variables/SPAMFILTER
# echo 0 > /service/qmail-smtpd.25/variables/SPAMEXITCODE

Saturday, October 24, 2009

Troublesome MySQL Configuration

Quite a few of users who attempt to install IndiMail first time, face the biggest issue with MySQL installation and configuration. Most of the issues relate to the following
  1. MySQL version less than 5.1: MySQL fails to startup under supervise
  2. MySQL version less than 5.1: svctool fails to create a default database for IndiMail during rpm installation.
  3. /etc/my.cnf uses socket=/var/lib/mysql/mysql.sock. IndiMail uses /tmp/mysql.sock. Connection to MySQL fails if you use mysql(1) (without -S opton).
  4. You get MySQL syntax error when running indimail programs
The solution to the first problem is to delete the lines --general-log-file and the line --slow-query-log from the file /service/mysql.3306/run. After deleting the lines you can issue the command

/var/indimail/bin/svc -u /service/mysql.3306

to start up MySQL.

The solution to the second problem is to create a blank MySQL database by running the following command

/var/indimail/bin/svc -d /service/mysql.3306
/bin/rm -r /var/indimail/mysqldb/data
/usr/bin/mysql_install_db --user=mysql --datadir=/var/indimail/mysqldb/data

chown -R mysql:mysql /var/indimail/mysqldb/data
/var/indimail/bin/svc -u /service/mysql.3306
mysql -u root -p
mysql> use mysql;
mysql> update user set password=PASSWORD('some_pass') where user='root';
mysql> CREATE USER indimail identified by 'ssh-1.5-';
mysql> CREATE USER mysql identified by '4-57343-';
mysql> CREATE USER admin identified by 'benhur20';
mysql> CREATE USER repl identified by 'slaveserver';
mysql> GRANT SELECT,CREATE,ALTER,INDEX,INSERT,UPDATE,DELETE, \
mysql> CREATE TEMPORARY TABLES, \
mysql> LOCK TABLES ON indimail.* to 'indimail';
mysql> GRANT RELOAD,SHUTDOWN,PROCESS,SUPER on *.* to admin;
mysql> GRANT REPLICATION SLAVE on *.* to repl;


The third problem can be solved by replacing socket=/var/lib/mysql/mysql.sock with socket=/tmp/mysql.sock in /etc/my.cnf or equivalent file. You can also copy /var/indimail/etc/indimail.cnf as .indimail.cnf in your home directory. i.e.

cp /var/indimail/etc/indimail.cnf $HOME/.indimail.cnf


To avoid the above problems, it is recommended to use one of the below MySQL versions
  • mysql-6.0.3-alpha
  • mysql-6.0.9-alpha
  • mysql-5.0.26
  • mysql-5.0.77
  • mysql-5.1.40
  • mysql-5.4.3-beta
  • mysql-5.5.0-m2
  • MariaDB 5.1.42
Let me know if you are using any version of MySQL other than the above. Run the following command to get the MySQL version

% mysql_config --version

The fourth problem relates to a workaround made in IndiMail to prevent MySQL injection. What is needed is to set NO_BACKSLASH_ESCAPES in the MySQL server. You can use either of the two methods below
  1. This SQL mode also can be enabled automatically when the server starts by using the command-line option
    `--sql-mode=NO_BACKSLASH_ESCAPES' or by setting
  2. Set `sql-mode=NO_BACKSLASH_ESCAPES' in the server option file (for
    example, `my.cnf' or `my.ini', depending on your system).


Thursday, October 15, 2009

Cost of writing IndiMail

IndiMail is Free Software / Open Source Software

What would it have costed to code IndiMail if it wasn't free and if there wasn't any FS/OSS ?

Using David A. Wheeler's 'SLOCCount' gives the following result. The cost has been arrived by using $12000/year as the average salary of an Indian programmer. Sloccount uses COCOMO Software Cost Estimation Model.

Total Estimated Cost to Develop = $ 3,011,907

SLOC Directory SLOC-by-Language (Sorted)

106466 clamav-0.95.2 ansic=94967,sh=11300,perl=199
73173 qmail-1.03 ansic=68645,perl=2361,sh=2167
58207 indimail-1.6.2 ansic=51563,sh=6644
45914 indium-1.0 tcl=39628,sh=5604,ansic=682
41943 bogofilter-1.2.1 ansic=34807,sh=4629,perl=1842,lex=475,lisp=179
14670 flash-0.9.4 ansic=8346,sh=6324
9762 ucspi-tcp-0.88 ansic=9581,sh=181
9362 altermime-0.3.10 ansic=5963,sh=3399
9317 mpack-1.6 ansic=9292,perl=25
8131 ripmime-1.4.0.9 ansic=8116,sh=15
4256 pam-multi-1.0 ansic=3053,sh=1203
3318 libdkim-1.3 cpp=2316,ansic=924,sh=78
1833 nssd-1.0 ansic=1833
1772 fortune-1.1 ansic=1698,sh=74


Totals grouped by language (dominant language first):
ansic: 299470 (77.16%)
sh: 41618 (10.72%)
tcl: 39628 (10.21%)
perl: 4427 (1.14%)
cpp: 2316 (0.60%)
lex: 475 (0.12%)
lisp: 179 (0.05%)


Total Physical Source Lines of Code (SLOC) = 388,124
Development Effort Estimate, Person-Years (Person-Months) = 104.58 (1,254.96)
(Basic COCOMO model, Person-Months = 2.4 * (KSLOC**1.05))
Schedule Estimate, Years (Months) = 3.14 (37.62)
(Basic COCOMO model, Months = 2.5 * (person-months**0.38))
Estimated Average Number of Developers (Effort/Schedule) = 33.36
Total Estimated Cost to Develop = $ 3,011,907
(average salary = $12,000/year, overhead = 2.40).


"generated using David A. Wheeler's 'SLOCCount'."
Saturday, August 29, 2009

Greylisting in IndiMail

Greylisting is a method of defending email users against spam, by temporarily rejecting any email from a IP/Sender which it does not recognize. As per SMTP, the originating server should after a delay retry. A server implementing greylisting should accept the mail if sufficient time has elapsed. If the mail is from a spammer it will probably not be retried since a spammer goes through thousands of email addresses and typically cannot afford the time delay to retry.

IndiMail 1.6 onwards implements greylisting using qmail-greyd daemon. You additionally need to have the environment variable GREYIP defined for the qmail-smtpd process. The environment variable GREYIP specifies on which IP and port, qmail-greyd is accepting greylisting requests. qmail-smtpd uses UDP to send a triplet (IP+RETURN_PATH+RECIPIENT) to the greylisting server and waits for an answer which tells qmail-smtpd to proceed ahead or to temporarily reject the mail. qmail-greyd also accepts a list of whitelisted IP addresses for which greylisting should not be done.

1. Enabling qmail-greyd greylisting server
% su
# svctool --greylist=1999 --servicedir=/service --min-resend-min=2 \
--resend-win-hr=24 --timeout-days=30 --context-file=greylist.context \
--save-interval=5 --whitelist=greylist.whitelist --use-greydaemon


NOTE: The above service has already been setup for you, if you have done a binary installation of IndiMail/indimail-mta

2. Enabling greylisting in SMTP
  • Assuming you've setup your qmail-smtpd service with tcpserver with the -x option (as in LWQ), you just need to update the cdb file referenced by this -x option. The source for this file is typically /etc/indimail/tcp.smtp. For example,
      127.:allow,RELAYCLIENT=""
      192.168.:allow,RELAYCLIENT=""
      :allow
    • could become,
      127.:allow,RELAYCLIENT=""
      192.168.:allow,RELAYCLIENT=""
      :allow,GREYIP="127.0.0.1@1999"
    • If you've setup qmail-greyd on a non-default address (perhaps you're running qmail-greyd on a separate machine), you'll also need to specify the address it's listening on - adjust the above to include GREYIP="192.168.5.5@1999", for example.
    • Finally, don't forget to update the cdb file corresponding to the source file you've just edited. If you have a LWQ setup that's,
      # qmailctl cdb

    • Alternatively (and particularly if you're not using the -x option to tcpserver) you can enable greylisting for all SMTP connections by setting GREYIP in the environment in which qmail-smtpd is started - for example your variables directory for qmail-smtpd can contain a file with the name GREYIP
      # echo GREYIP=\"127.0.0.1@1999\" > /service/qmail-smtpd.25/variables/GREYIP
    NOTE: The above instructions are for IndiMail/indimail-mta 2.x and above. For 1.x releases, use /var/indimail/etc for the location of tcp.smtp and tcp.smtp.cdb

    Thursday, August 20, 2009

    Creating Self-Signed Certificate for TLS/SSL encryption

    If you have installed indimail using any of the RPM at

    http://download.opensuse.org/repositories/home:/mbhangui/


    you will get IMAPS, POP3S, SMTPS services installed by default. However Certificate are not installed by default. You may want to study the following google search. If you have not installed IndiMail using the RPM, then you can use svctool to create the IMAPS, POP3S, SMTPS services. Executing svctool without any option will give you a help screen.

    You can save yourself a lot of trouble by using svctool to create self-signed certificate for IMAPS, POP3S, SMTPS (or starttls in smtp)

    # /var/indimail/svctool --postmaster=postmaster@yourdomain --config=cert

    You are about to be asked to enter information that will be incorporated into your certificate request. What you are about to enter is what is called a Distinguished Name or a DN. There are quite a few fields but you can leave some blank. For some fields there will be a default value, If you just hit Enter, the field will be left blank. Please note: The common name must be the name of the mail server so make sure you enter it on that line:

    Country Name (2 letter code) [GB]:IN
    State or Province Name (full name) [Berkshire]:Goa
    Locality Name (eg, city) [Newbury]:Porvorim
    Organization Name (eg, company) [My Company Ltd]:IndiMail
    Organizational Unit Name (eg, section) []: Technology
    Common Name (eg, YOUR name) []: yourdomain
    Email Address []:user@domain.xxx

    Once you have given the above input, your certificate will be generated

    % ls -l /var/indimail/control/*.pem
    -rw-------. 1 indimail indimail 245 2009-08-19 07:39 dh1024.pem
    -rw-------. 1 indimail indimail 156 2009-08-19 07:39 dh512.pem
    -rw-------. 1 indimail indimail 497 2009-08-19 07:38 rsa512.pem
    lrwxrwxrwx. 1 root root 36 2009-08-19 07:38 clientcert.pem -> /var/indimail/control/servercert.pem
    -rw-r-----. 1 indimail indimail 2197 2009-08-19 07:38 servercert.pem

    Now you can use the following commands to test the services

    To connect to IMAPS
    openssl s_client -connect localhost:993

    To connect to POP3S
    openssl s_client -connect localhost:995

    To connect to SMTPS
    openssl s_client -connect localhost:465

    Wednesday, April 1, 2009

    How to set DKIM signature in IndiMail

    What is DKIM
    DomainKeys Identified Mail (DKIM) lets an organization take responsibility for a message while it is in transit. DKIM has been approved as a Proposed Standard by IETF and published it as RFC 4871. There are number of vendors/software available which provide DKIM signing. IndiMail is one of them. You can see the full list here.
    DKIM uses public-key cryptography to allow the sender to electronically sign legitimate emails in a way that can be verified by recipients. Prominent email service providers implementing DKIM (or its slightly different predecessor, DomainKeys) include Yahoo and Gmail. Any mail from these domains should carry a DKIM signature, and if the recipient knows this, they can discard mail that hasn't been signed, or has an invalid signature.


    IndiMail from version 1.5 onwards, comes with a drop-in replacement for qmail-queue for DKIM signature signing and verification (see qmail-dkim(8) for more details). You need the following steps to enable DKIM. IndiMail from version 1.5.1 onwards comes with a filter dk-filter, which can be enabled before mail is handed over to qmail-local or qmail-remote (see spawn-filter(8) for more details).
    You may want to look at an excellent setup instructions by Roberto Puzzanghera for configuring dkim for qmail at http://notes.sagredo.eu/node/92


    Create your DKIM signature
    % mkdir -p /etcindimail/control/domainkeys
    % cd /etc/indimail/control/domainkeys
    # openssl genrsa -out rsa.private 1024
    # openssl rsa -in rsa.private -out rsa.public -pubout -outform PEM
    # mv rsa.private default
    # chown indimail:qmail default (name of our selector)
    # chmod 440 default
    Create your DNS records
    $ grep -v ^- rsa.public | perl -e 'while(<>){chop;$l.=$_;}print "t=y; p=$l;\n";'
    _domainkey.indimail.org.  IN TXT  "t=y; o=-;"
    default._domainkey.indimail.org.  IN TXT  "DNS-public-key"
    
    choose the selector (some_name) and publish this into DNS TXT record for:
    
    selector._domainkey.indimail.org (e.g. selector can be named 'default')
    
    Wait until it's on all DNS servers and that's it.
    
    Set SMTP to sign with DKIM signatures
    qmail-dkim uses openssl libraries and there is some amount of memory allocation that happens. You may want to increase your softlimit (if any) in your qmail-smtpd run script.
    # cd /service/qmail-smtpd.25/variables
    # echo "/usr/bin/qmail-dkim" > QMAILQUEUE
    # echo "/etc/indimail/control/domainkeys/default" > DKIMSIGN
    # svc -d /service/qmail-smtpd.25; svc -u /service/qmail-smtpd.25
    
    
    Set SMTP to verify DKIM signatures
    
    You can setup qmail-stmpd for verification by setting
    DKIMIVERIFY environment variable instead of DKIMSIGN environment variable.
    
    # cd /service/qmail-smtpd.25/variables
    # echo "/usr/bin/qmail-dkim" > QMAILQUEUE
    # echo "" > DKIMVERIFY
    # svc -d /service/qmail.smtpd.25; svc -u /service/qmail-smtpd.25
    
    DKIM Author Domain Signing Practices
    IndiMail supports ADSP. A DKIM Author Signing Practice lookup is done by the verifier to determine whether it should expect email with the From: address to be signed.
    The Sender Signing Practice is published with a DNS TXT record as follows:
    _adsp._domainkey.indimail.org. IN TXT "dkim=unknown"
    The dkim tag denotes the outbound signing Practice. unknown means that the indimail.org domain may sign some emails. You can have the values "discardable" or "all" as other values for dkim tag. discardable means that any unsigned email from indimail.org is recommended for rejection. all means that indimail.org signs all emails with dkim.
    You may decide to consider ADSP as optional until the specifications are formalised. To set ADSP you need to set the environment variable SIGN_PRACTICE=adsp. i.e
    # echo adsp > /service/smtpd.25/variables/SIGN_PRACTICE
    You may not want to do DKIM signing/verificaton by SMTP. In that case, you have the choice of using the QMAILREMOTE, QMAILLOCAL environment variables which allows IndiMail to run any script before it gets passed to qmail-remote, qmail-local respectively.


    Setting qmail-remote to sign with DKIM signatures
    On your host which sends out outgoing mails,
    it only make sense to do DKIM signing and not verification.
    
    # cd /service/qmail-send.25/variables
    # echo "/usr/bin/spawn-filter" > QMAILREMOTE
    # echo "/usr/bin/dk-filter" > FILTERARGS
    # echo "/etc/indimail/control/domainkeys/default" > DKIMSIGN
    # echo "-h" > DKSIGNOPTIONS
    # svc -d /service/qmail-send.25; svc -u /service/qmail-send.25
    
    Setting qmail-local to verify DKIM signatures
    
    On your host which serves as your incoming gateway
    for your local domains, it only makes sense to do
    DKIM verification with qmail-local
    
    # cd /service/qmail-send.25/variables
    # echo "/usr/bin/spawn-filter" > QMAILLOCAL
    # echo "/usr/bin/dk-filter" > FILTERARGS
    # echo "/etc/indimail/control/domainkeys/default" > DKIMVERIFY
    # svc -d /service/qmail-send.25; svc -u /service/qmail-send.25
    
    
    Testing outbound signatures
    Once you have installed your private key file and added your public key to your DNS data, you should test the server and make sure that your outbound message are having the proper signatures added to them. You can test it by sending an email to sa-test (at) sendmail dot net. This reflector will reply (within seconds) to the envelope sender with a status of the DomainKeys and DKIM signatures.
    If you experience problems, consult the qmail-dkim man page or post a comment below and I’ll try to help.
    You can also use the following for testing.
    • dktest@temporary.com, is Yahoo!'s testing server. When you send a message to this address, it will send you back a message telling you whether or not the domainkeys signature was valid.
    • sa-test@sendmail.net is a free service from the sendmail people. It's very similar to the Yahoo! address, but it also shows you the results of an SPF check as well.
    All the above was quite easy. If you don't think so, you can always use the magic options --dkverify (for verification) or --dksign --private_key=domain_key_private_key_file to svctool (svctool --help for all options) to create supervice run script for qmail-smtpd, qmail-send.
    References
    1. http://notes.sagredo.eu/node/82


    Wednesday, February 11, 2009

    IndiMail now has a RPM and Yum repository

    Using Red Hat Package Manager (RPM) is a popular way of installing software on Linux systems. I have been always comfortable with the usual ./configure; make; sudo make install-strip.

    Not everyone is comfortable with gory details involved during compilation. So with some effort I started reading RPM manuals on the net. The first two days I found it quite tough getting things together but after the exercise, the knowledge gained has helped me to tweak the configure scripts and makefiles better.

    IndiMail now longer uses hard-coded directories inside Makefiles. Libraries for example now go into @libdir@ in Makefile.am. This resolves to /usr/lib on 32 bit systems and /usr/lib64 on 64 bit systems.

    The biggest learning came from Open Build Server (OBS). The service provides software developers with a tool to create and release open source software for openSUSE and other Linux distributions easily on different hardware architectures and for a broad user audience. Users can easily find the latest open source packages they are looking for and customize them.
    The biggest advantage of OBS is that it is quite unforgiving. It took me 4 complete days before I could generate the first successful RPM package. Compared to that, building the RPM on my own laptop was trivial.

    Currently, the list of supported distributions for IndiMail is (for both 32 and 64 bit)
    • SUSE
      • openSUSE 11.2
      • openSUSE 11.1
      • openSUSE 11.0
      • SUSE Linux Enterprise 11
      • SUSE Linux Enterprise 10
      • openSUSE Factory
    • Red Hat
      • Fedora 13
      • Fedora 12
      • Fedora 11
      • Fedora 10
      • Red Hat Enterprise Linux 5
      • CentOS 5
    • Mandriva Linux
      • Mandriva 2010
      • Mandriva 2009.1
      • Mandriva 2009
    The RPM's can be downloaded here. You will find directories for the above Linux distros. Each directory has a Yum Repository file. You can save the .repo file in /etc/yum.repos.d for yum to automatically download and install IndiMail. The RPM are part of IndiMail from Release 1.3.4.

    Wednesday, January 14, 2009

    IndiMail Release 1.3

    INTRODUCTION

    IndiMail is a Scalable, Secure, Reliable, Efficient, and a highly
    configurable Mailing Solution. IndiMail allows Users in a domain to be
    distributed across multiple hosts (without NFS). IndiMail has multiple
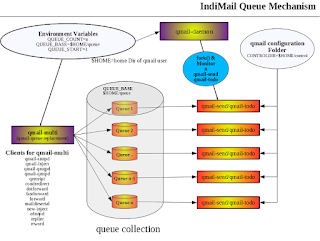
    queues to provide a high speed queuing. IndiMail uses a heavily modifed version of qmail.

    IndiMail also provides programs to manage Virtual Domains and large number of users in Virtual Domains. These users can be distributed across multiple hosts. A high speed query lookup daemon (inlookup) allows IndiMail to handle large number of queries with MySQL as the RDBMS.

    By default, IndiMail provides an authentication module for Courier IMAP called authindi. It also provides a Password Lookup Service using Name Service Swith (NSS). This allows any IMAP/POP3 server to work with IndiMail as long as the IMAP/POP3 server provides for authentication of users agains the system's /etc/passwd, /etc/shadow. The Password Lookup Service extends the system's getpwnam() family of functions to work with IndiMail's MySQL database without making any code changes to IMAP/POP3 server. Hence theoritically IndiMail can be used with almost any IMAP/POP3 server.

    IndiMail has been undergoing several changes especially on simplification of Installation. After quite a few testing with some users of IndiMail, many of the Install issues have been sorted out. I am happy to release IndiMail Version 1.3 which fixes quite a few Installation issues. The file INSTALL has been overhauled.

    IndiMail uses supervise (part of daemontools package) to startup and monitor all services. This allows IndiMail to achieve very high uptimes. IndiMail also uses envdir as part of its startup script. This allows all all configuration items to be easily configured by changing environment variables or simple text files called Control Files. A tool called svctool, with command-line options which helps you to configure any configuration item in IndiMail (creation of supervise scripts, qmail configuration, installation of all default MySQL tables, creation of default aliases, users, etc).

    There are four Mailing Lists for IndiMail


    1. indimail-support - You can subscribe for Support at https://lists.sourceforge.net/lists/listinfo/indimail-support. You can email indimail-support@lists.sourceforge.net for posting messages to this list.
    2. indimail-devel - You can subscribe at https://lists.sourceforge.net/lists/listinfo/indimail-devel
    3. indimail-announce - This is only meant for announcement of New Releases or patches. You can subscribe at http://groups.google.com/group/indimail. You can email indimail-devel@lists.sourceforge.net for posting messages to this list.
    4. Archive at Google - http://groups.google.com/group/indimail. This group acts as a remote archive. Any discussions posted here goes to indimail-support.
    There is also a Project Tracker for IndiMail (Bugs, Feature Requests, Patches, Support Requests) at
    http://sourceforge.net/tracker/?group_id=230686

    Summary of Changes in 1.3

    1. Added dumpconfig command in svctool. To show all variables configured in supervise.
    2. Made Changes and Corrected typos in INSTALL.
    3. Fixed INSTALLATION issues. Modifed file INSTALL, Makefile.am, svctool.in, bootstrap
    4. Added function backfill to fill empty slots left (by deleting users) in dir_control
    5. Create queue_base control file when creating queues
    6. Added --sql-mode=NO_BACKSLASH_ESCAPES
    7. Added documentation for training bogofilter.
    8. Created wordlist.db from corpus at http://wwww.spamassassin.apache.org/publiccorpus/
    9. Create empty wordlist.db if wordlist.db does not exist
    10. Changed Makefile.am to fix dependencies of qmail on IndiMail
    11. Completed backfill code for dir_control
    12. Locking can now be specified in --enable-file-locking=y|n|s||l||f. Which allows one to use flock(), semaphores or links for providing locking operations.
    13. Fixed remove_line() removing all matched line. New option now to remove only the first matched line.

    IndiMail Queue Mechanism

    Indimail has the ability of configuring multiple local and remote queues. A queue is a location on your hard disk where email are deposited ...